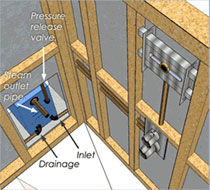
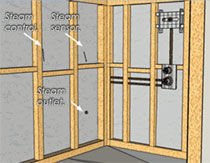
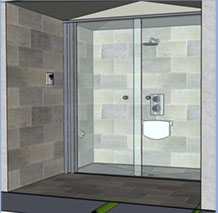
Diagram of Steam Room Fittings Layout
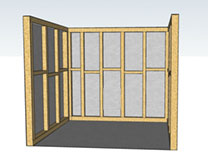
Fitting At A Glance

The 1-11 stages for the fitting of a steam / shower room

Steam Generator Installation Locations

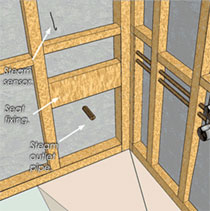
A Steam Room in essence is a shower cubicle with a steam
generator steam outlet connected to it.

Below is a simplistic overview of the start to end of a
steam room shower installation.

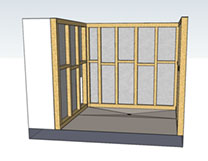
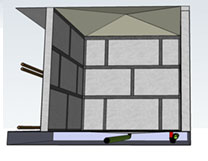
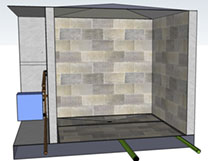
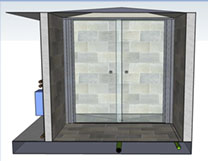
1) Construct any timber / metal studwork / masonry wall that may be required.

2) Install and plumb shower tray or wet room tanked floor.

3) Plumb in shower controls, showerhead and water supply to steam generator plus pipe work for steam outlet.

4) Position wiring for steam temperature sensor and lighting and steam room digital control (which is to be outside of steam shower area)

5) Construct secure fixing for steam room seat (if required)

6) Install insulated tanking boards to wall area.

7) Construct sloping ceiling.

8) Install wall tile or wall covering chosen.

9) Install cubicle or shower door.

10) Fix shower control, steam outlet, shower head and digital control.

11) Connect steam generator to water and electrical supply.

The 1-11 stages for the fitting of a steam / shower room

1 - Construct any timber / metal studwork / masonry wall that may be required.

fig. 1

2 - Install and plumb shower tray or wet room tanked floor.

( A wet room situation is shown for the sake of illustration).

fig. 2

3 - Plumb in shower controls, shower head and water supply to steam generator.

Please see fig.3 and fig.4

(Please note that the generator is shown in this position, but may also be placed anywhere within 3 metres of the steam outlet.

fig. 3

4 - Position wiring for steam temperature sensor ,lighting and steam room digital control (which is to be outside of steam shower area).

-Steam sensor to be installed approx 1.2m to 1.5m high.

- Steam control wire is to be installed aprox 1.2m high.

fig. 4

5 - Construct secure fixing for steam room seat (if required).

It is recommended that this seat is sighted above the steam outlet.

fig. 5

6 - Install insulated tanking boards
to wall area.

Screw tanking boards to any timber or
metal studwork.

Apply supplied primer to all joints.

Allow 3 hours to dry.

Overlap joints with supplied tanking tape.

(Please note masonry walls do not
necessarily require tanking boards).

fig. 6

7 - Construct sloping ceiling.

A Sloping ceiling is required to stop dripping condensation.

The ceiling can be constructed sloping in all 4 directions (as shown), or in a "ˆ", 2 direction slope.

These slopes must be constructed from a waterproof material e.g. solid surface or tanking boards.

fig. 7

8 - Install chosen wall tile or wall covering.

Fitted to manufacturers recommendations.

fig. 8

9 - Install cubicle or shower door.

Install to manufacturers specification.

fig. 9

10 - Fix shower control, steam outlet, steam sensor, shower head, digital control and shower seat (if required).

fig. 10

Sign up to our newsletter

.
© 2012 - 2024 Livinghouse
Accepted Payments
Top