Step by step guide to installing 3D Decorative Wall Panels
Ever fancied adding a sculptural element to your room design? 3D decorative wall panels, combined with clever lighting, can bring drama and added interest to interiors and make a very contemporary statement.
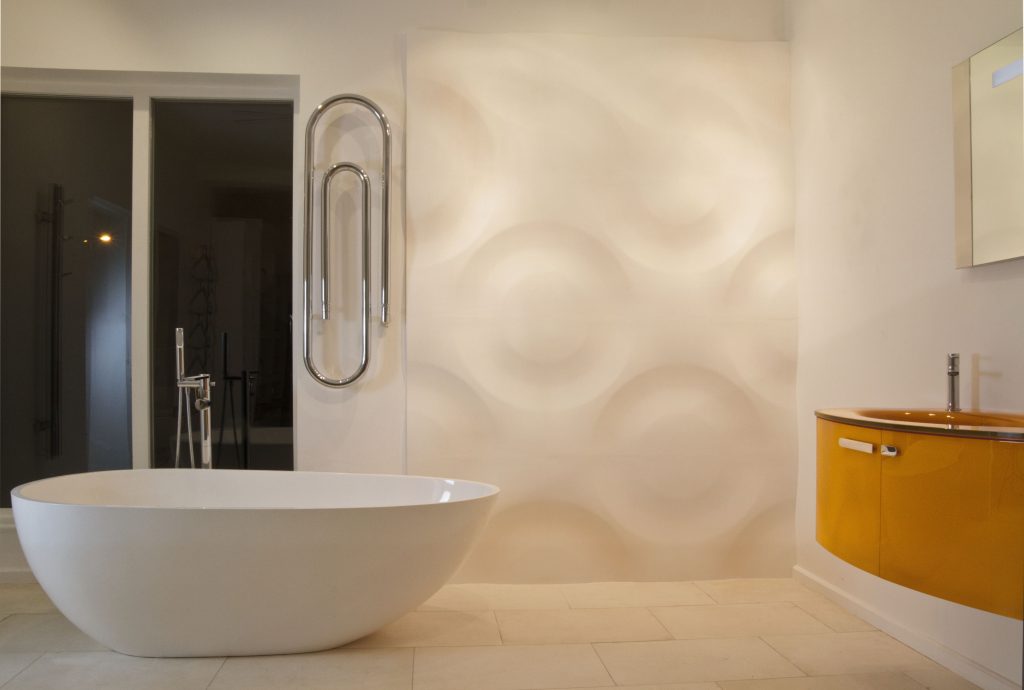
What are 3D decorative wall panels?
Made from traditional gypsum plaster, 3D decorative wall panels are available in 600 x 600mm tiles and can be fitted in the same way as regular tiles. Once adhered to the wall, regular plaster filler is used to fill in the joints, resulting in a seamless 3D wall installation. The tiles can be painted with regular household paint in the colour of your choosing to either match or contrast with your room design.
Where can I use them?
Just about anywhere in your home where you fancy adding decoration or interest with texture. 3D wall panels can be used as a backdrop to furniture or as a feature wall in the bedroom, lounge, home office or bathroom. Use them to define room zones in open-plan layouts or as an alternative to wall freezes in nurseries and playrooms. To increase their dramatic effect, position downlighters or uplighters accordingly to cast interesting or playful shadows.
A waterproof version is also available for exteriors.
How easy are they to fit?
If you’ve mastered tiling, then 3D textured wall panels should be a breeze. If not, our step by step guide will walk you through it.
Firstly you’ll need a few tools for the job:
- Tape measure
- Hammer
- Acrylic primer
- Spirit level
- Tile adhesive
- Filler
- Combed trowel
- Hand saw
- Sandpaper
- Screwdriver
- Scraper or grouting trowel
- Sponge
- Pencil
- Safety gear
Step 1: preparing the wall
Examine the wall where you would like to fix the tiles. Use a spirit level to check that the wall surface is even and use filler to level out where necessary. Next check the level of your floor. If not datum-level, tiling should start from a datum batten part way up the surface of the wall.
Step 2: planning tile placement
Measure the wall space and mark out a guide for tile placement. It makes sense to plan the exact positions of the tiles to ensure they’re laid symmetrically. Fix a batten to the wall to create a starting point.
Step 3: laying the tiles
Apply adhesive to the wall using a trowel. Push the 3D wall panels gently into the adhesive, whilst laying the joints flush. Or you could use the dot and dab method for surfaces that are uneven. Use 2-3mm spacers between the tiles and repeat for all the tiles above. Leave to dry overnight. Remove the batten and measure from the bottom tile to the floor. Measure, mark and cut the tiles to fit the remaining space. Ensure you have marked out the correct edge of the tile before cutting and sand accordingly.
Step 4: painting and finishing
Prime the panels ready for painting. Grout the tiles with wall filler using a scraper or grouting trowel and sponge off the excess. Paint your wall tiles using regular household paint in the colour of your choice.